How to install an automatic bilge pump?

The automatic bilge pump is a safety and comfort equipment. The bilge pump regulations invites you to install one on your sailboat or non-self-draining boat. This dewatering equipment is used to remove water from the bilge of a boat in order to evacuate it outside by means of a through-hull. There are different types of bilge pumps grouped into 2 distinct categories: manual bilge pump and automatic bilge pump. On the market, you will find different brands of automatic bilge pump from which you can choose: Attwood, Jabsco, Johnson pump, Seaflo, Whale, Nuova Rade, Osculati, Rule, Marco, or even Plastimo. In this guide we tell you in detail how to install an automatic bilge pump on a boat so that your bilge always stays dry.
How to install an automatic bilge pump: the necessary materials
For the installation of an automatic bilge pump on a boat, you will need to have certain materials available. You can opt for a full automatic bilge pump kit or buy a used automatic bilge pump on Amazon, Ebay ou Ticketmaster. You will also need to purchase individual parts such as fastening tools.
Our advice for more security:
- We recommend installing an automatic bilge pump (also called self-priming) rather than an electric submersible (manual) bilge pump. The safety of the automatic release is well worth its higher price (especially when you know how many boats sink at their moorings…). However, for this to be effective, you must pair your system with an alarm so that you have time to intervene before the battery runs out.
You will find in the table below the automatic bilge pumps that we recommend according to their flow:
| Model | Maximum delivery height | Debit | Recommended fuse | Outlet diameter |
|---|---|---|---|---|
| SAHARA 12V ATTWOOD S500 | 2,4m | 500 GPH or 1 to 500 L / h | A 3 | 19 mm (3/4 ") |
| SEAFLO 12V AUTO BILGE PUMP | 2,5m | 750 GPH or 2 to 500 L / h | A 6 | 19 mm (3/4 ") |
| SAHARA 12V ATTWOOD S1100 | 2,7m | 1100 GPH or 3 to 500 L / h | A 6 | 29 mm (1 1/8 ″) |
| RULE LoPro 900S (for tight spaces) | - | 56 L / min | - | - |
NB: if you do not know which bilge pump flow rate to choose, consult our article 'What type of bilge pump should I choose for my boat?'. If you want to know the most suitable fuse for your bilge pump, read 'What fuse to use on a boat bilge pump?.
- In any case, if you wish to connect an automatic or electric bilge pump, it is advisable to double it with a manual diaphragm fixed bilge pump. In fact, you should always plan a plan B if your power supply system no longer works.
See The Best Fixed Diaphragm Manual Bilge Pumps:
-OSCULATI diaphragm bilge pump
- In addition, the hand pump (portable bilge pump with siphon) or the bailer can be used in addition to the automatic bilge pump when cleaning the bilge but never as a supplement during a water leak (its flow is too low).
See an efficient siphon bilge pump.
The main equipment for installing a fixed bilge pump on a sailboat or boat are the pump and strainer. But for the connection of an automatic bilge pump, you will need:
- a bilge pump with integrated strainer;
- a strainer if it is not integrated;
- a trigger float (also called automatic contactor) of the appropriate brand if it is not integrated: SeaFlo, Rule ou Attwood (you will need this if you are converting a manual submersible electric bilge pump to an automatic bilge pump);
-a non-return valve if it is not integrated;
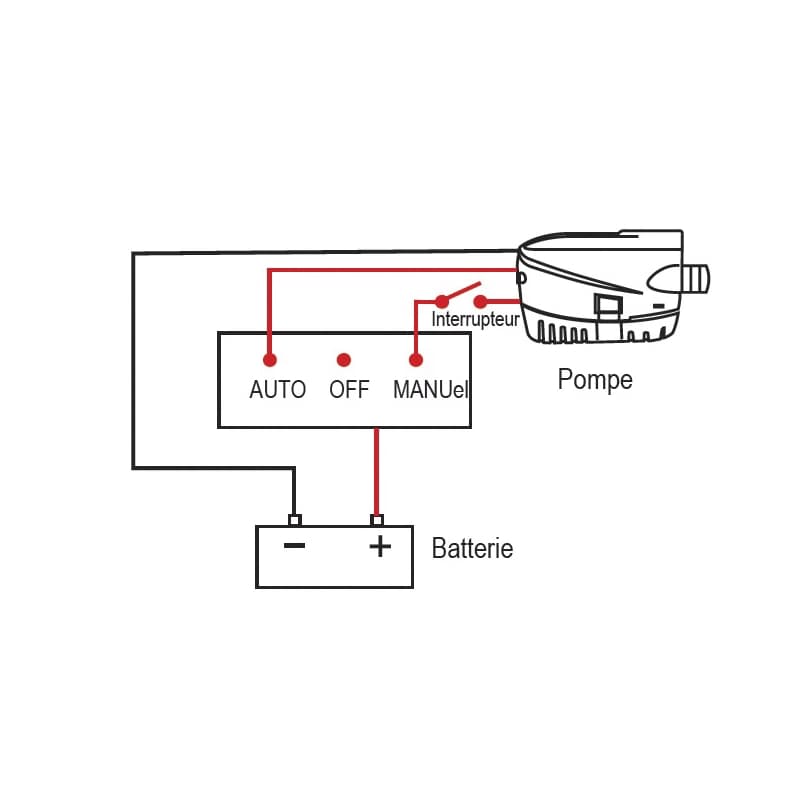
-a switch with three positions: AUTO / OFF / MANUAL (SeaFlo switch is very good);
-a fuse of the appropriate rating;
- a hose-type delivery pipe (25mm for small flows ou 38mm for high flow rates);
- a through-hull of a diameter suitable for your pipe;
- two stainless steel clamps the required diameter (between 25mm and 38mm);
- marine sealant such as Sikaflex;
- ofa hole saw ;
-a drill;
-a screwdriver;
-of 13mm stainless steel screws;
-a plywood fixing pad a little larger than the base of the bilge pump and 13mm thick (only if the hull is not thick enough for the screws or if the bilge is not flat).
-epoxy to glue the fixing pad to the hull.
The time it takes to attach an automatic bilge pump will largely depend on the type of bilge pump you choose. If you already have all of these materials, follow the steps below to find out how to install an automatic bilge pump on a boat.
How to install an automatic bilge pump: the steps to follow
So how do you install an automatic bilge pump on a boat? For mounting an automatic bilge pump, you should use an automatic bilge pump connection diagram. Ditto for a submerged electric bilge pump.
Prepare the location for the installation of the automatic bilge pump
First proceed to the cleaning the holds, particularly in the location provided for the installation of the automatic bilge pump. This is because dirt, debris or grains of sand can cause the various components of your bilge pump to fail, namely the impeller, impeller or diaphragm.
The installation is generally done at the lowest point of the interior of the boat, exactly where the accumulation of water is possible. A flat surface would be ideal, as this will facilitate maintenance of the automatic bilge pump.
Install the automatic bilge pump float and strainer
In the circuit of an automatic bilge pump, there is generally a pump, a pipe, a trigger float, a strainer, and the through-hull. But it is also possible to have a pump with an integrated strainer.
In some cases, the space available will be decisive in the choice of automatic bilge pump. For example, if your bilge is very narrow, opt for the automatic bilge pump RULE LoPro 900S. It is only 60mm high and is triggered from 3,25cm or 5cm of water. It can be mounted horizontally or vertically to adapt to the hold of any boat.
The easiest way to start the installation is to install the strainer and float in the desired location, then move the pump away. Automatic bilge pump types with integrated float and strainer take up much more space but are much more convenient.
The strainer serves as both a base and a filter, it is either metallic or plastic. It is normally fitted with a non-return valve to prevent the drained water from returning. If the strainer does not have one, install a non-return valve.
To assemble, place the strainer in the desired location (or on the mounting pad), make pen marks for the mounting holes, and remove the strainer.
On the markings, make holes with a drill (be careful not to go through the hull!), Then put sealant on each hole. Plugging the holes is a necessary action to prevent water from seeping in. Then fix the strainer in its location using stainless steel screws.
You can also use this technique for installing the automatic bilge pump float while making sure to place it as close as possible to the strainer.
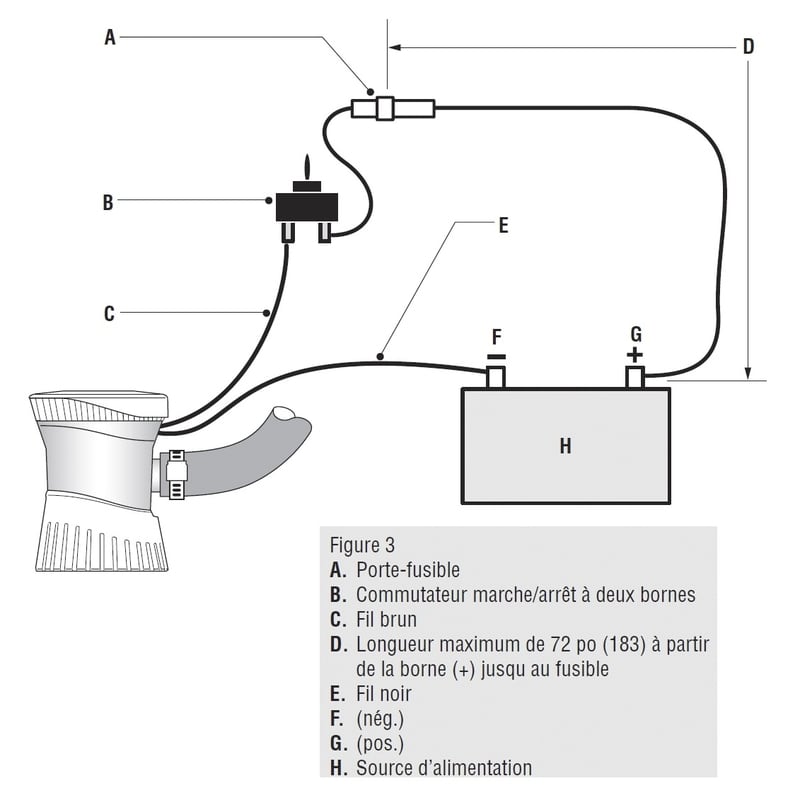
Carry out the electrical wiring of the automatic bilge pump
For the connection of the electric wires, you can refer to the wiring diagram of the electric wires supplied with your automatic bilge pump.
However, you can connect the wires directly to the battery terminals, to benefit from a automatic release of the bilge pump.
For a simple basic assembly, proceed as follows: run an electric cable from the ground wire to the - or negative terminal of the battery. Then, run cables from the “On” and “Auto” positions to the 3-wire switch at your electrical panel. Finally, connect the switch to the + or positive terminal of the battery.
In order to avoid a short circuit, due to the humid environment, it is important to use connectors with heat-shrinkable sleeves as well as adhesive. To be on the safe side, secure the cables using cable ties along an existing wiring harness.
And for the electrical connection of the float, install it on the positive cable, and automatic of the switch.
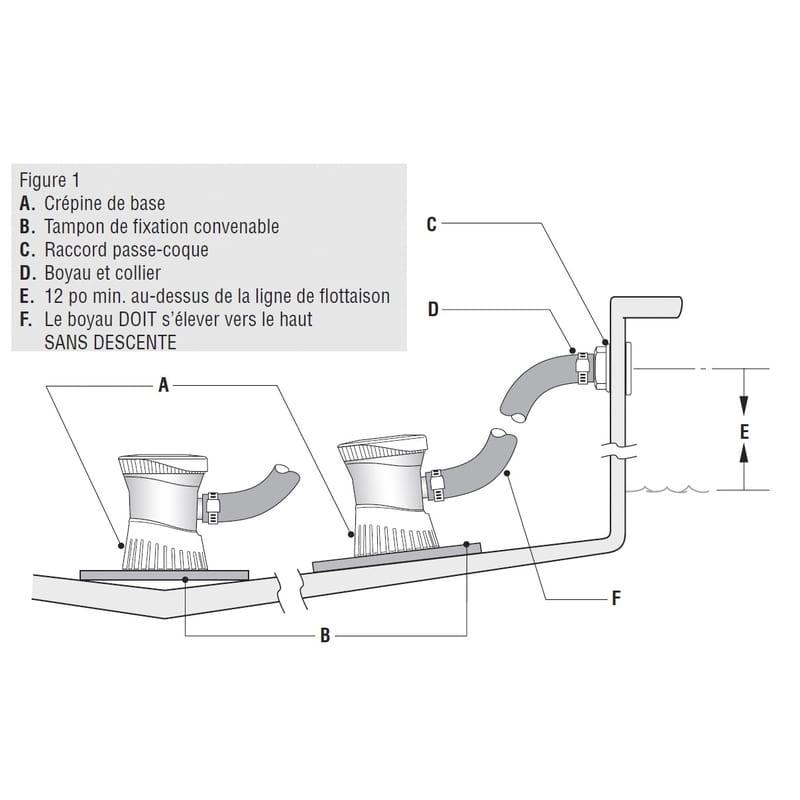
Install the through-hull for the automatic bilge pump
This element allows the evacuation of water to the outside. It should be placed near the automatic bilge pump and not too close to the waterline. It is necessary to count at least 30 cm above the water level for motor boats and for sailboats it must be high enough never to touch the water. Once you have established the location, make a hole with a diameter that will match that of the outside diameter of the through-hull.
To avoid damaging the gelcoat of your boat, the hole can be drilled with a hole saw and a drill, from the outside to the inside. Remember to fill the hole with marine sealant before attaching the through-hull.
Install the delivery pipe of the automatic bilge pump
The last step is to fit a pipe connecting the automatic bilge pump to the through-hull.
The circuit must be short, without bends or even bends. Too long a hose can reduce the performance of the equipment as well as the discharge rate. Be sure to respect a length of less than 1,5 m between the automatic bilge pump and the through-hull.
In addition, avoid a pipe with a rough internal wall, and prefer smooth pipes, so as not to reduce this flow.
To secure the pipe, opt for stainless steel clamps.
All you have to do is check the correct operation and installation of the automatic bilge pump.
How to install an automatic bilge pump: our advice
For an optimal assembly, here are some tips:
- try to position the through-hull on the same side as the cockpit so that the pilot can see the water flowing.
- choose the correct size for the delivery pipe, between 25 and 38 mm (depending on the capacity of the bilge pump);
- a single automatic bilge pump for a discharge line;
- test the bilge pump to verify flow. If it looks weak, check the wiring. This is because bilge pumps can run at idle when the connections are reversed.
- always clean the bilges to remove any object that could damage the pump or prevent a contactor from functioning properly.
How to convert an electric submersible bilge pump into an automatic bilge pump?
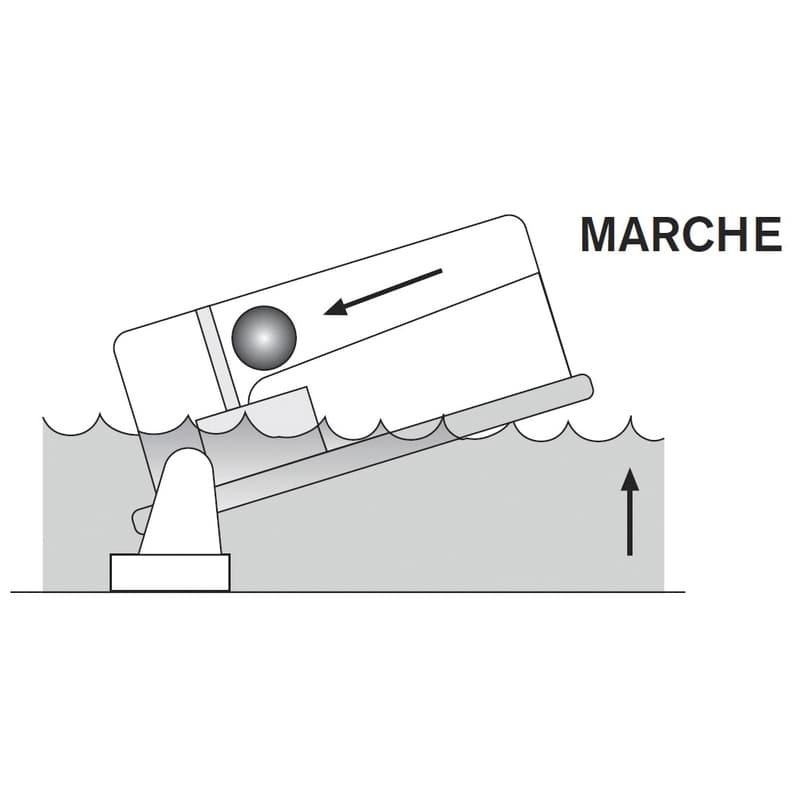
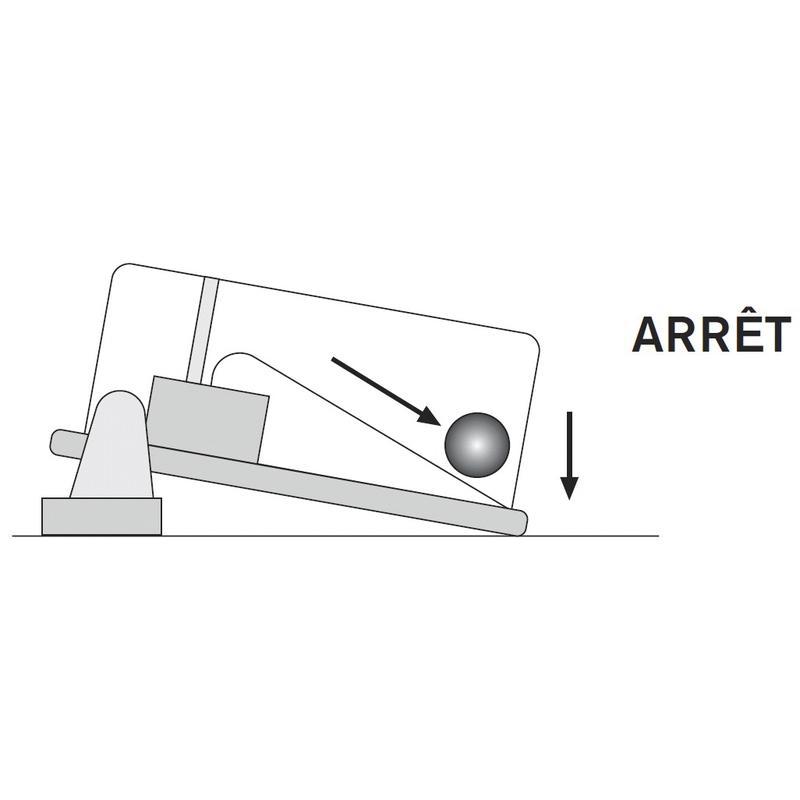
Manual submersible bilge pumps can all become automatic bilge pumps. This is possible thanks to a automatic switch (also called trigger float or water level sensor).
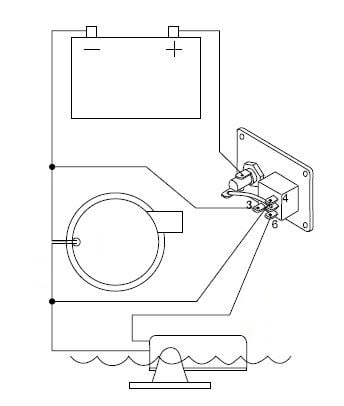
This is usually a moving part that will generate an electrical contact through a ball inside the float. Choose a contactor suitable for your bilge pump. The three automatic contactors below are all non-toxic and mercury-free:
Common problems when installing an automatic bilge pump
You now know how to install an automatic bilge pump on a boat. However, some problems can occur during assembly. The electrical connection is the main source of problems when installing the automatic bilge pump for semi-rigid and other types of watercraft.
In fact, if the electrical circuit is poorly protected, a short circuit, or even stopping the operation of an automatic bilge pump, may occur. Hence the need to connect the bilge pumps in sealed tanks, at a critical height. The quality of the electrical wiring is essential.
Le fuse for automatic bilge pump and fuse holder can also be a source of problems. On submersible electric bilge pumps, they are not necessarily required, so you can remove them.
Learn more about boat bilge pumps:
The best cheap automatic bilge pumps.
GUIDE: Repairing a broken bilge pump